NannyML Cloud
HomeBlogNannyML OSS Docs
v0.24.0
v0.24.0
  • ☂️Introduction
  • Model Monitoring
    • Quickstart
    • Data Preparation
      • How to get data ready for NannyML
    • Tutorials
      • Monitoring a tabular data model
      • Monitoring with segmentation
      • Monitoring a text classification model
      • Monitoring a computer vision model
    • How it works
      • Probabilistic Adaptive Performance Estimation (PAPE)
      • Reverse Concept Drift (RCD)
    • Custom Metrics
      • Creating Custom Metrics
        • Writing Functions for Binary Classification
        • Writing Functions for Multiclass Classification
        • Writing Functions for Regression
        • Handling Missing Values
        • Advanced Tutorial: Creating a MTBF Custom Metric
      • Adding a Custom Metric through NannyML SDK
    • Reporting
      • Creating a new report
      • Report structure
      • Exporting a report
      • Managing reports
      • Report template
      • Add to report feature
  • Product tour
    • Navigation
    • Adding a model
    • Model overview
    • Deleting a model
    • Model side panel
      • Summary
      • Performance
      • Concept drift
      • Covariate shift
      • Data quality
      • Logs
      • Model settings
        • General
        • Data
        • Performance settings
        • Concept Drift settings
        • Covariate Shift settings
        • Descriptive Statistics settings
        • Data Quality settings
    • Account settings
  • Deployment
    • Azure
      • Azure Managed Application
        • Finding the URL to access managed NannyML Cloud
        • Enabling access to storage
      • Azure Software-as-a-Service (SaaS)
    • AWS
      • AMI with CFT
        • Architecture
      • EKS
        • Quick start cluster setup
      • S3 Access
    • Application setup
      • Authentication
      • Notifications
      • Webhooks
      • Permissions
  • NannyML Cloud SDK
    • Getting Started
    • API Reference
  • Probabilistic Model Evaluation
    • Introduction
    • Tutorials
      • Evaluating a binary classification model
      • Data Preparation
    • How it works
      • HDI+ROPE (with minimum precision)
      • Getting Probability Distribution of a Performance Metric with targets
      • Getting Probability Distribution of Performance Metric without targets
      • Getting Probability Distribution of Performance Metric when some observations have labels
      • Defaults for ROPE and estimation precision
  • Experiments Module
    • Introduction
    • Tutorials
      • Running an A/B test
      • Data Preparation
    • How it works
      • Getting probability distribution of the difference of binary downstream metrics
  • miscellaneous
    • Engineering
    • Usage logging in NannyNL
    • Versions
      • Version 0.24.0
      • Version 0.23.0
      • Version 0.22.0
      • Version 0.21.0
Powered by GitBook
On this page
  • Installation
  • Authentication
  • Example
  • Step 1: Authenticate and load data
  • Step 2: Set up the model schema
  • Step 3: Create the model
  • Step 4: Ensure continuous monitoring
  • Step 5 (optional): Add delayed ground truth data
  1. NannyML Cloud SDK

Getting Started

Interact programatically with nannyML cloud throughout its SDK

PreviousPermissionsNextAPI Reference

Last updated 5 months ago

NannyML Cloud SDK is a Python package that enables programmatic interaction with NannyML Cloud. It allows you to automate all aspects of NannyML Cloud, including:

  • Creating a model for monitoring.

  • Logging inferences for analysis.

  • Triggering model analysis

If you prefer a video walkthrough, here's our YouTube guide:

Installation

pip install git+https://github.com/NannyML/nannyml-cloud-sdk.git

Authentication

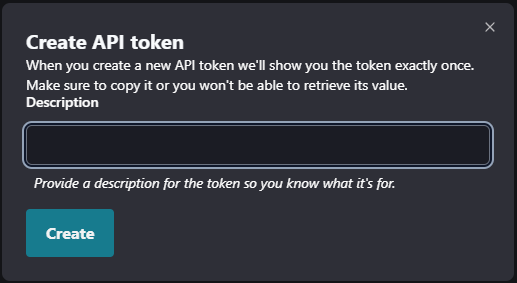
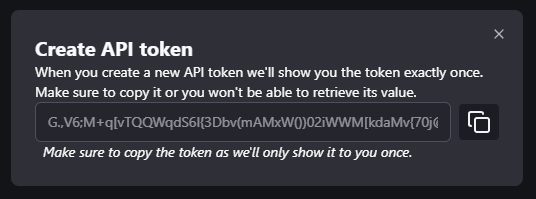
After clicking the create button you'll be presented with a prompt to enter an optional description for the API token. We recommend describing what you intend to use the token for so you know which token to revoke later when you no longer need it. Copy the token from the prompt and store it in a secure location.
Once you have an API token you can use it to authenticate the NannyML Cloud SDK. Either by inserting the token & URL directly into the python code:

import nannyml_cloud_sdk as nml_sdk

nml_sdk.url = "https://beta.app.nannyml.com"
nml_sdk.api_token = r"api token goes here"

Or using environment variables:

import nannyml_cloud_sdk as nml_sdk
import os

nml_sdk.url = os.environ['NML_SDK_URL']
nml_sdk.api_token = os.environ['NML_SDK_API_TOKEN']

We recommend using an environment variable for the API token. This prevents accidentally leaking any token associated with your personal account when sharing code.

Example

The following snippets provide an example of how you can set up the monitoring data and create a model in NannyML Cloud to start monitoring it.

Step 1: Authenticate and load data

import nannyml_cloud_sdk as nml_sdk
import os
import pandas as pd

nml_sdk.url = os.environ['NML_SDK_URL']
nml_sdk.api_token = os.environ['NML_SDK_API_TOKEN']

# Load a NannyML binary classification dataset to use as an example
reference_data = pd.read_csv('https://github.com/NannyML/nannyml/raw/main/nannyml/datasets/data/synthetic_sample_reference.csv')

analysis_data = pd.read_csv('https://github.com/NannyML/nannyml/raw/main/nannyml/datasets/data/synthetic_sample_analysis.csv')

target_data = pd.read_csv('https://github.com/NannyML/nannyml/raw/main/nannyml/datasets/data/synthetic_sample_analysis_gt.csv')
print(reference_data.head())

Step 2: Set up the model schema

We use the Schema class together with the from_df method to set up a schema from the reference data.

In this case, we define the problem as 'BINARY_CLASSIFICATION' but other options like 'MULTICLASS_CLASSIFICATION' and 'REGRESSION' are possible.

# Inspect schema from dataset and apply overrides
schema = nml_sdk.monitoring.Schema.from_df(
    'BINARY_CLASSIFICATION',
    reference_data,
    target_column_name='work_home_actual',
    ignore_column_names=('period'),
    identifier_column_name='id'
)

Step 3: Create the model

We create a new model by using the create method. Where we can define things like how the data should be chunked, the key performance metric, etc.

# Create model
model = nml_sdk.monitoring.Model.create(
    name='Example model',
    schema=schema,
    chunk_period='MONTHLY',
    reference_data=reference_data,
    analysis_data=analysis_data,
    target_data=target_data,
    key_performance_metric='F1',
)

In case you are wondering why we need to pass the reference_data twice —once in the schema and another in the model created— the reason is that both steps are treated differently. In the schema inspection step, we transmit only a few rows (100 to be precise) to the NannyML Cloud server for deriving the schema. While when creating the model, the entire thing is uploaded, so that will take a bit more time.

Step 4: Ensure continuous monitoring

The previous three steps allow you to monitor an ML on the analysis data previously set. But once new production data is available, you might want to know how your model is performing on it.

You can load any previously set model by searching for it by name. Then, it's a matter of loading the new model predictions, adding them to the model using the method add_analysis_data, and triggering a new monitoring run.

# Find the previous model in NannyML Cloud by name
model, = nml_sdk.monitoring.Model.list(name='Example model')

# Add new inferences to NannyML Cloud
new_inferences = pd.DataFrame()
nml_sdk.monitoring.Model.add_analysis_data(model['id'], new_inferences)

# Trigger analysis of the new data
nml_sdk.monitoring.Run.trigger(model['id'])

new_infererences can be a dataset with several new model inferences:

or even a single observation:

Step 5 (optional): Add delayed ground truth data

# If you have delayed access to ground truth, you can add them to NannyML Cloud
# later. This will match analysis & target datasets using an identifier column.
delayed_ground_truth = pd.DataFrame()
nml_sdk.monitoring.Model.add_analysis_target_data(model['id'], delayed_ground_truth)

# Trigger analysis of the new data
nml_sdk.monitoring.Run.trigger(model['id'])

Currently, the package hasn't been published on PyPI yet, which means you cannot install it via the regular Python channels. Instead, you'll have to install directly from the .

To use the NannyML Cloud SDK, you need to provide the URL of your NannyML Cloud instance and an API token to authenticate. You can obtain an API token on the page of your NannyML Cloud instance.

To run the example, we will use the synthetic dataset included in the NannyML OSS library, where the model predicts whether a customer will repay a loan to buy a car. Check out to learn more about this dataset.

More info about the Schema class can be found in its .

More info about the Model class can be found in its .

It is also worth noting that you can trigger a monitoring run whenever you want (e.g., after adding 1000 observations) by calling the trigger method from the class.

If ground truth becomes available at some point in the future, you can add it to nannyML Cloud by using the method add_analysis_target_data from the class.

repository
account settings
Car Loan Dataset
API reference
API reference
Run
Model
Link to account settings from the header
API tokens on account settings page
Create API token prompt
Generated token prompt